Mini Chubby Fly Tying Tutorial

PATTERN DESCRIPTION: The Mini Chubby Chernobyl was my best fly pattern in 2015. I started fishing this pattern in the middle of June and continued to fish it through September with tremendous results. I’m certain this pattern would have been effective through October if we had any October Caddis flying around on this side of the Continental Divide. Tied in a size 14 with cocoa 2mm foam, brown wiggly legs and flashy gold dubbing, this foam fly pattern seems to represent everything from caddis, small stoneflies, grasshoppers, and spruce moths. At times fish would crush The Mini like a fluttering insect getting ready to escape and other times, fish would sip this fly in like it was matching the hatch. Whenever the spruce moths were flying about and landing on the water, this fly worked flawlessly. The Mini is a great all around fly pattern because it looks a lot like everything that trout love to eat.
I’ve been working on tying up a small Chubby Chernobyl type fly for quite some time, but was never really happy with the results until I omitted the extra set of legs from the original and substituted the thinner Superflex leg material for the Sili Legs. The Superflex legs are thinner and much more durable than Sili Legs and as a result, look better on this fly. Because of the durability of the Superflex leg material, I started tying all of my Chubby patterns with it. When adding the wing to the Chubby, I tie the wing in with a loop-wing method. This method uses minimum thread wraps and provides a durable wing.
The Mini Chernobyl is an easy fly to tie, and an extremely durable and effective fly that should be in your fly box. Check out the Mini Chubby Fly Tying Tutorial and let me know what you think.
MATERIAL NEEDED:
Hook: Dai-Riki 710 3xl nymph hook – size 14
Thread: 8/0 or 70 denier dark thread like black, dark gray, brown
Dubbing: Gold or Goldenstone Sparkle Dubbing…the Sparklier the better. *I blend my own dubbing out of STS Trilobal Dub Gold, mixed with gold Red Heart Acrylic Yarn. The mix of the two materials makes a great, easy to use dubbing. Most flashy dubbings, like STS Trilobal Dub are a real pain to work with by themselves.
Body: 2mm Thin Fly Foam Sheets – Cocoa
Wing: Poly Wing – 1 strand
Legs: Superflex Spandex Leg Material – Brown
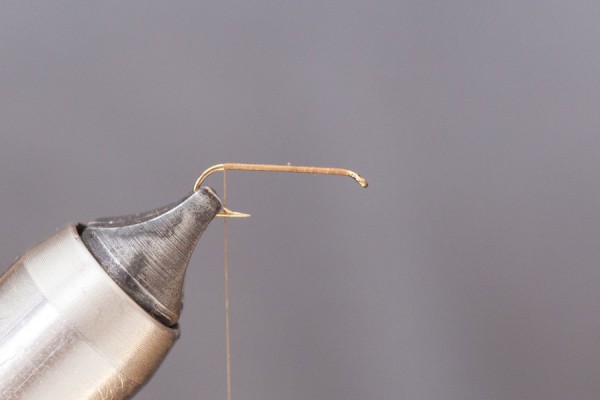
Step 1: Wrap a 3 layer thread base.

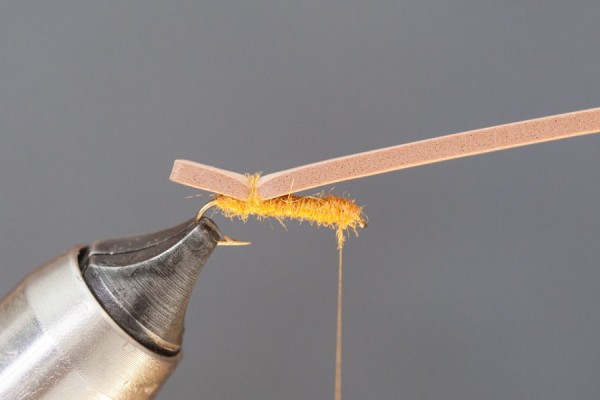
Step 2: Dub a thick body of gold dubbing onto the back-half of the hook, as shown above. End the tying thread at the hook point. The finished dubbed body on the Mini Chubby Chernobyl will be rather robust and nymph-like rather than thin, like a dry fly body.

Step 3: Cut a strip of 2mm sheet foam about the width of the gap of the hook. Next, round the edges of the foam strip.

Step 4: Position the foam strip over the dubbed body. The rear of the foam strip should extend just beyond the bend of the hook. Bind down the foam strip with 2-3 firm thread wraps.
Step 5: Finish dubbing the body of the fly as shown above. End the thread just behind the eye of the hook. I usually apply a thin amount of dubbing to the thread and build up the body of the fly in multiple layers rather than try to build up the body of the fly in one pass with lots of dubbing on the thread.
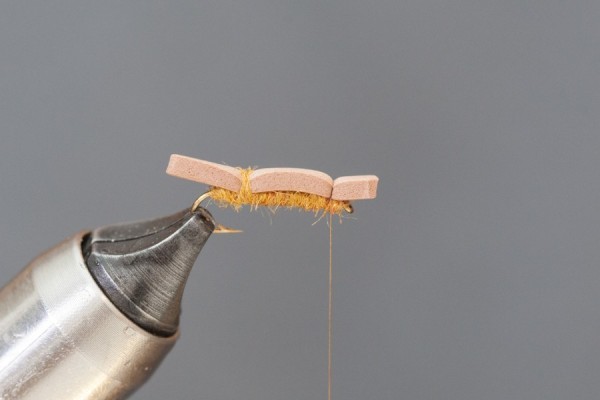
Step 6: Bind down the foam strip at the head of the fly with 2-3 firm thread wraps.
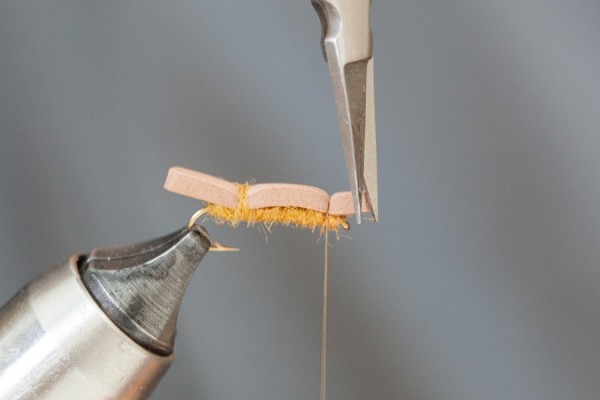
Step 7: Round the edges of the foam strip.

Step 8: Apply the Superflex legs to both sides of the foam body of the fly with 3-4 thread wraps. The Superflex leg material has a slight, natural curl when cut into short pieces. Tie the legs in against the natural curl of the material for a more natural look. If you tie in the legs with the curl, the legs will close together.

Step 9: Comb out a single strand of Poly Wing material. Next, position the wing on top of the fly as shown above.
Step 10: Bind down the poly wing with 3-4 firm thread wraps. Keep the thread wraps to a minimum here so as not to create too much bulk at the head of the fly.
Step 11: Grab the poly wing extending over the head of the fly. Pull the wing back while leaving a little “loop” or slack in the poly wing. Form a loose wrap of tying thread around the poly wing then, using your off hand, pull the poly wing and slowly make a small loop in the poly wing as shown above. Bind wing down with 3-4 firm wraps of thread. I’ve been tying all of my Chernobyl Wings with the loop-wing-method because it’s very durable, quick, and uses fewer thread wraps.

Step 12: Poly wing tied in with a loop. This method is great for tying in Chubby Chernobyl poly wings.

Step 13: Trim the wing just beyond the foam body.

Step 14: Apply a thin amount of dubbing to the thread, just enough to cover up the exposed thread wraps. Whip finish fly with 3-4 wraps.
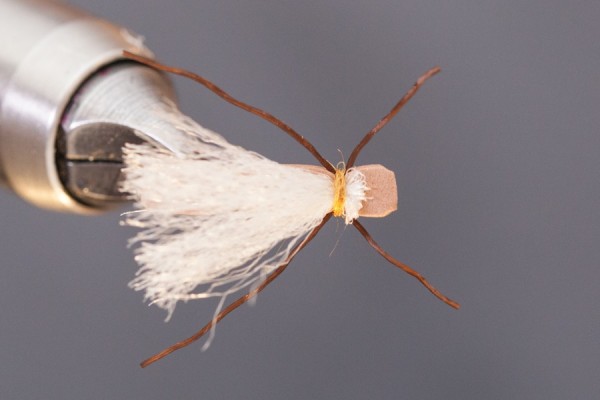
Finished Mini Chernobyl.
The Cartman Stonefly and Hopper Tying Tutorial

PATTERN DESCRIPTION: The Cartman is an easy to tie, realistic foam pattern that imitates stoneflies, crickets, and grasshoppers. I’ve been working on foam cylinder patterns for years, but was never really happy with the results until I started tapering the ends of the cylinders, which creates a more realistic, buggy shape. Foam cylinders come in many sizes and colors and make quick, durable, simple fly bodies in sz.6-14. I had great results this spring with a sz.12 all black pattern used during the Skwala hatch and had great results the last couple of years fishing a sz.6 during the Salmonfly hatch on the Yellowstone River and Big Hole River here in Montana. Olive, tan and yellow work well tied with various styles of hopper legs to imitate grasshoppers.
MATERIAL NEEDED:
HOOK: Dai-Riki #710 3xl hook
THEAD/BODY: Iridescent Veevus Thread
BODY: Foam Cylinder 3/16″
WING: Poly Wing – 1 strand
LEGS: Superflex Legs

Step 1: Wrap a 2 layer thread base with the appropriate colored thread, dubbing or Iridescent Thread. End just 2 wraps behind eye of hook.

Step 2: Apply a thin layer of Zap a Gap to thread base.

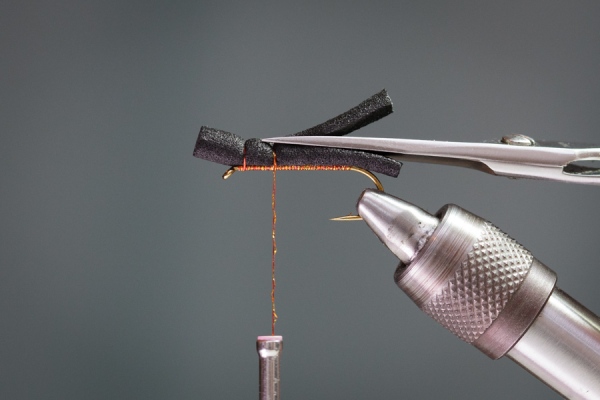
Step 3: Position foam cylinder onto hook as shown above. Take care to center the foam body on top of hook. Once positioned, press the foam onto the hook and hold for 2-3 seconds, or until the Zap a Gap dries.

Step 4: Bind down the foam cylinder body with 2-3 wraps of thread just behind the eye of the hook. Next, advance the thread back to 1/4 point of hook, and again, bind down the foam body with 2-3 firm wraps of thread as shown above.

Step 5: Trim foam stonefly body to desired length. I trimmed the pattern above about a hook gap beyond point of hook.

Step 6: Trimmed salmon fly body.

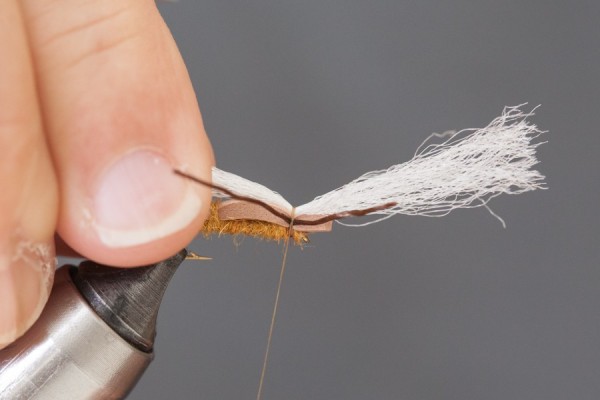
Step 7: Trim the foam cylinder body as shown above. Trim the foam cylinder at a slight angle. Start the cut at the middle point of the foam cylinder, and end it at the hanging thread.
 Step 8: Trim the foam wedge with one cut of the scissors. The purpose of cutting out the foam wedge helps the poly wing lay flat along the body, creating a realistic stonefly wing profile. Plus it creates a tapered foam body much like the real insect.

Step 9: Trimmed foam body.

Step 10: Picture of foam wedge. Save the foam wedge for Step 19.

Step 11: Advance thread towards hook eye. Bind down 1 strand of poly wing with 2-3 wraps of thread.

Step 12: Advance thread back and again, bind down poly wing with 1-2 wraps of thread.

Step 13: Pull back remain strand of poly wing and bind down the 2-3 firm wraps of thread.

Step 14: Trim poly wing to length, just beyond end of foam body.

Step 15: Trimmed poly wing.

Step 16: Attach superflex legs to both sides of salmon fly with 3-4 thread wraps. I typically add a drop of glue to all the legs after the fly is complete to lock them into place rather than bind them down with a bunch of bulky thread wraps.

Step 17: Top view of secured legs.

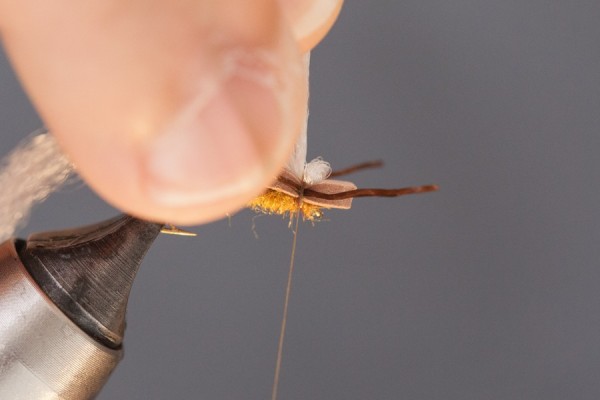
Step 18: Apply a thin layer of Zap a Gap to wing and thread as shown above. Apply glue to rear thread wraps only.

Step 19: Bind down foam wedge with the thin end facing towards the back of the fly with 3-4 thread wraps.

Step 20: Advance thread forward, underneath the foam wedge.

Step 21: Apply another thin layer of Zap a Gap to thread wraps and onto head of fly.

Step 22: Press on foam wedge for 2-3 seconds or until glue dries.

Step 23: The foam wedge adds some bulk to the front portion of the fly and help fold the poly wing down and back creating a realistic stonefly sillouette.

Step 24: Secure another pair of super flex legs to both side of the fly with 3-4 thread wraps.

Step 25: Whip finish fly at hook eye.

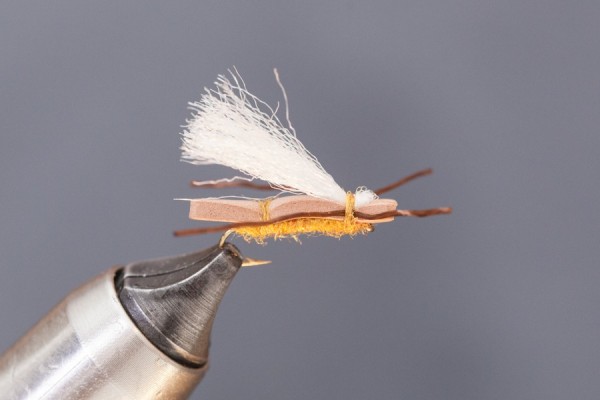
Step 26: Taper the head of the fly as shown.

Step 27: Add glue to leg wraps and thread wraps to secure the fly.

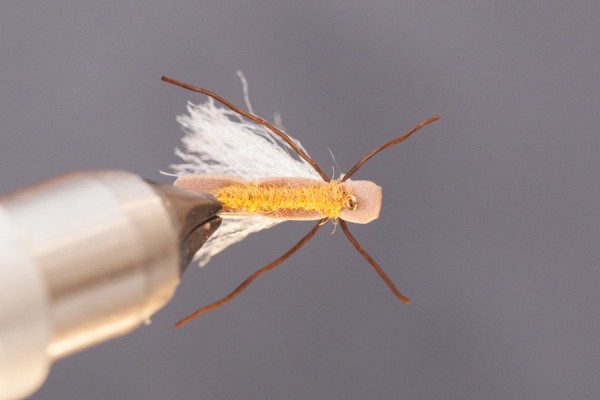
I added a tiny strip of orange foam to this one to give it an even buggier look.

Top view of the foam cylinder fly.

Tie up your own variations of this pattern and let me know how they work for you! And be sure to check out our store if you are looking for materials to tie any of the patterns we have here on the Hopper Fishing Blog.
Simple Foam Caddis Tying Tutorial

PATTERN DESCRIPTION: The Simple Foam Caddis is the best floating, easy to see caddis pattern that is simple to tie and simply catches fish. I’ve had tremendous luck during the Mother’s Day Caddis hatch here on the Yellowstone River near Livingston, Montana with this pattern fished as either a single dry or used as a dry-dropper combo trailing a small caddis nymph or soft hackle. This foam pattern can be tied in many different colors of foam and thread to match October Caddis, Spruce Moths and black caddis. I have added Sili Legs and hackle on bigger patterns like size 8-12 for buggy looking attractor patterns. One of my favorite variations includes an orange poly wing and 1mm tan foam. Best thing about this pattern is that it floats forever. No dry shake or flyagra required. Tie a few up and let me know what you think.
MATERIALS NEEDED:
Hook:Dai Riki 060 or standard 1xl dry fly hook
Thread/Body: Iridescent Veevus Thread – Olive
Underwing: 1mm tan, cinnamon or brown foam
Wing: Poly Wing – 1/2 strand
Hackle: Grizzly Hackle

Step 1: Wrap a thread base/body with Iridescent Thread. End thread about 1/4 hook length behind eye as shown above.

Step 2: Cut a strip of 1mm foam. Width of foam should be gap of hook in width, or little less.

Step 3: Cut a “V” shaped notch in foam strip.

Step 4: Apply a thin layer of superglue to the thread wraps from the barb, to the hanging thread only.

Step 5: Place foam strip onto hook. The foam underwing should be centered on the hook and should extend just beyond bend of hook.

Step 6: Bind down foam strip with 2 wraps of thread.

Step 7: Lift foam strip as shown and apply a thin layer of superglue to underside of foam.

Step 8: Fold foam in half, length-wise.

Step 9: Hold the folded foam for a few second until the superglue dries. This creates a slender, caddis-like head.

Step 10: Trim remaining strip of foam as shown at a slight angle.

Step 11: Photo of trimmed head.

Step 12: Bind down foam body with 2-3 turns of thread as shown above.

Step 13: View of underside of body.

Step 14: Apply 1/2 strand of poly yarn with 1 wrap of thread. You can try to substitute poly wing with z-lon or antron, but poly wing floats this fly like a cork while nylon doesn’t.

Step 15: Advance thread back, then bind down poly wing with 1 thread wrap.

Step 16: Sweep back the remaining poly strand and bind down wing with 2-3 wraps of thread.

Step 17: Trim poly wing just beyond end of foam body as shown. I typically stretch the poly wing back, then cut the wing about 1/8″ beyond foam body.

Step 18: Attach a hackle stem with 2-3 wraps of thread.

Step 19: Apply 3 turns of hackle, then secure hackle with 2-3 turns of thread.

Step 20: Trim a “V” in the hackle on the bottom of the fly, flush with the body.

Step 21: For a more durable fly, apply a dab a superglue to trimmed hackle wraps.

Step 22: Complete Simple Foam Caddis.


If you enjoy our step-by-step fly tying tutorials, we would love it if you check out The Hopper Store, our online store where we sell our favorite foam fly tying products and fishing accessories.
Thunder Beetle Tutorial
PATTERN DESCRIPTION:
The Thunder Beetle is a high floating, buggy pattern made to imitate beetles and cicada’s. Beetles are very common terrestrials, therefore make great patterns to fish in any type of water throughout the year. The bulky profile of a beetle is unmistakable and big trout will seldom refuse a well presented beetle imitation. I mainly tie Thunder Beetles with a black body. For the underbody, I prefer peacock, black, blue, purple and red colors. If you don’t have any beetles in your fly box, tie up a few Thunder Beetles and give them a try when nothing else seems to be working. You might be surprised by the results.
MATERIALS NEEDED:
HOOK: Dai Riki 710 (3xl nymph hook)
THREAD: Veevus 8/0 Black
BODY: 3mm Black Foam
UNDERBODY: Peacock Herl
EYES: 2mm foam strip
THUNDER THIGH LEGS: 1mm foam strip, Superfloss Leg Material
FRONT LEGS: Black Superflex
WING: Poly Wing
 STEP 1:
Form a thread base with tying thread. End thread beyond barb of hook as shown. *With beetle patterns, I prefer the the look of the completed beetle further back on the hook, therefore, I push the pattern beyond the barb of the hook.

STEP 2:
Advance thread towards eye of hook. Next, cut a strip of 3mm foam. Width of foam should be about 1 1/2 times width of gap and at least 2 inches long.

STEP 3:
Apply a thin layer of superglue to thread wraps.

STEP 4:
Bind down foam with firm, spaced thread wraps, working towards bend of hook.

STEP 5:
End at bend of hook as shown above. I prefer the look of beetles pushed back on the hook, covering up the bend of the hook slightly. I haven’t noticed any hookup issues with this fly design.

STEP 6:
Compress foam underbody with firm thread wraps working back and forth. The underbody will be covered up with dubbing or herl in the next step, so no need for perfection here.

STEP 7:
Apply 5-7 strands of peacock herl by the tips. To reinforce the herl, you can make a dubbing rope by wrapping the herl around the thread, and then wind forward, or you can apply a gold wire ribbing over the herl.

STEP 8:
Wind herl forward taking care to cover foam underbody.

STEP 9:
Secure butt ends with thread and then trim flush.

STEP 10:
Position thread about 1/4 ways back from the hook eye as shown above.

STEP 11:
Pull and stretch foam strip over the body and bind down foam with 5-6 firm wraps of thread.

STEP 12:
Lift up foam strip and advance thread forward to hook eye.

STEP 13:
Again, bind down foam strip with 5-6 firm thread wraps.

STEP 14:
Cut a thin strip of red, green or white foam to be used as eyes. Place thin strip of foam over the top of the fly.

STEP 15:
Advance thread back to 1/4 of the way behind eye of hook as shown above. Next, fold the black foam strip back onto itself and bind down with 4-5 firm thread wraps. Notice the foam head is extended just beyond the eye of the hook.

STEP 16:
Trim the remaining foam strip flush with the body.

STEP 17:
Advance thread forward, over the top of the fly, to just behind eye of hook. Next, trim eye material flush with the bullethead.

STEP 18:
Apply a strand of poly yarn with 2-3 firm wraps of thread.

STEP 19:
Advance thread back to 1/4 way behind hook and bind down poly yarn with 2-3 firm wraps of thread.

STEP 20:
Top view of beetle.

STEP 21:
Trim poly wing flush with end of beetle body. Next, prepare thunder thigh legs with foam strip and superfloss.
Here is a quick video demonstrating how to create the legs:

STEP 22:
Advance thread forward as shown above.

STEP 23:
Bind down thunder thigh legs on both sides of fly with 2-3 thread wraps.

STEP 24:
Top view.

STEP 25:
Trim the butt ends of the foam legs and secure with thread wraps. Next, tie in 3-5 strands of herl on top of fly.

STEP 26:
Attach front legs on both sides of the fly. Next, make a dubbing rope with the herl and tying thread and cover any visible thread wraps, ending at hook eye.

STEP 27:
End herl at hook eye and whip finish. Dubbing can be substituted for ease and durability is desired.

STEP 28:
Competed Thunder Beetle.


Slim Jim Hopper Tying Tutorial

PATTERN DESCRIPTION: The Slim Jim is a versatile pattern that I came up with a few years ago and have been using ever since. It can be tied as an attractor, or fine tuned to imitate specific caddis or stoneflies. Bulky foam patterns like the Chubby Chernobyl or the Morrish Hopper sit very low in the water creating an easy, bold image for the fish to see. In low, clear water, fish may eventually shy away from bulky flies and more readily take higher riding flies that sit on top of, rather than in, the water. The Slim Jim sits high on the water and presents more of a slim, fluttering profile that really seems to attract fish. I have had great success with this fly in size 6 using 2mm black fuzzy foam on the Big Hole and Yellowstone Rivers, and had similar results fishing a size 14 tan/red or tan/pink Slim Jim during the peak of summer when the fish weren’t looking for traditional, bulky hopper patterns. The 2mm fuzzy foam is a unique and simple material that can be incorporated into many foam fly patterns. Simply match the tying thread to the color of fuzzy foam, and you get a great looking buggy fly without the use of any dubbing.
MATERIALS NEEDED:
Hook: Dai Riki 710 sizes 4-16 (3xl nymph hook)
Thread: 8/o Veevus (match thread to fuzzy foam color)
Body: 2mm Fuzzy Foam or MH Fuzzy Bodies
Wing: Chubby Wing (poly)
Legs: Zebra Hopper Legs
Post: 1mm Orange Foam
Or you can get our Slim Jim Hopper Kit that includes enough fuzzy bodies, poly wing, legs, hi-vis post material for 1 dozen flies.

Step 1: Wrap a 3 layer thread base onto hook. End at mid point.

Step 2: Apply a thin coat of SuperGlue to thread wraps. Apply glue to mid point of hook and back to point of hook only.

Step 3: Attach MH Fuzzy Body or shaped Fuzzy Foam body to hook with 3-4 firm wraps of thread.

Step 4: Advance thread to just behind hook eye.

Step 5: Apply thin layer of SuperGlue to remaining thread wraps.

Step 6: Bind down foam body with 2-3 firm wraps of thread.

Step 7: Take care not to crowd eye of fly.

Step 8: Top view of attached foam body.

Step 9: Attach a single strand of Poly Wing to top of fly with 2 wraps of thread.

Step 10: Advance thread back to previous segment as shown above. Next, lightly pull back poly wing.

Step 11: Bind down wing with 2-3 firm wraps of thread.

Step 12: Trim poly wing to length. Length of wing should extend to end of body, or just beyond.

Step 13: Trimmed wing.

Step 14: Prepare a strip of 1mm orange foam. Strip of foam should be width of foam body.

Step 15: Round edges of orange post.

Step 16: Secure post with 2 firm wraps of thread.

Step 17: Prepare Zebra Hopper Legs. Pictured are Fine Zebra Hopper Legs – Goldenstone, trimmed to length of body.

Step 18: Bind down legs on both sides of body with 5-6 thread wraps. You will further secure the legs later with SuperGlue.

Step 19: Top view of tied in legs.

Step 20: Lift up orange foam strip and advance thread to forward segment, as shown above.

Step 21: Top view of thread advanced forward.

Step 22: Bind down orange foam strip with 2 wraps of thread.

Step 23: Lightly stretch orange foam strip and trim flush. The more you stretch the foam the closer the cut.

Step 24: Attach legs to both sides of body with 4-5 thread wraps.

Step 25: Tied in legs.

Step 26: Advance thread forward to hook eye, and whip finish. Carefully apply a small amount of SuperGlue to exposed thread wraps to secure legs.
That’s it! Give it a try and let me know what you think of this pattern. And send pics our way too – we always love to see what you’re creating from the tutorials.

The 360˚ Slim Jim Hopper
Chubby Ant Tutorial

PATTERN DESCRIPTION: The Chubby Ant is a high floating, easy to see ant that really catches fish. An ant pattern can be a fantastic fly during the summer months fished as a searching pattern, or to imitate real ants, or flying ants that somehow, always end up in every stream here in Montana. Fish seem to really key into ants at any time during the summer months. Ants can also be used during hatches, especially trico hatches, to attract rising fish. I have seen steadily rising trout keyed into trico’s move 4-5 feet to chase down a size 16 Chubby Ant on both freestone rivers and tailwaters. I like to fish a small hopper trailed by a size 14-16 Chubby Ant during the late summer months. I am no longer surprised that the ant will catch more trout and larger trout almost every time. The Chubby Ant is a simply deadly, easy to see, and easy to tie pattern that will surely surprise you.
MATERIAL NEEDED:
Hook: Dai Riki 730 sizes 12-18 (2xl nymph hook)
Thread: Black 8/0
Body: 1mm Black Foam, cut into hook-gap wide strip
Wing: 1 strand Chubby Poly Wing
Legs: Zebra Hopper Legs – Black Fine

Step 1: Wrap a 3 layer thread base onto hook. End at point of hook.

Step 2: Cut a thin strip of 1mm foam. Trim foam to width of gap of hook.

Step 3: Secure tip of foam strip to the top of hook with 3 wraps of thread. Notice strip of foam is extended towards back of hook.

Step 4: Fold the 1mm foam strip forward forming the rear metasoma or body of the ant. The fold should extend to just beyond the bend of hook.

Step 5: Bind down foam with 3 firm wraps.

Step 6: Lift up foam strip and advance thread to 1 eye length short of eye-of-hook.

Step 7: Lay foam strip on top of hook.

Step 8: Bind down foam with 3 firm wraps of thread.

Step 9: Wrap thread back 2-3 wraps towards bend of hook to secure foam to hook as shown above. End thread at 2 eye-lengths back from eye-of-hook.

Step 10: Fold remaining foam strip back to form the head of the ant as shown above. Notice the fold extends, just beyond eye-of-hook.

Step 11: Trim tag of foam strip flush with body.

Step 12: Comb out one strand of Chubby Poly Wing.

Step 13: Secure Chubby Poly Wing on top of hook with firm thread wraps.

Step 14: Bind down poly wing with firm thread wraps, advancing towards point of hook. Don’t worry about covering all of the white poly wing with this step.

Step 15: With firm thread wraps, cover and compress the waist of the ant to just beyond mid point of the waist as shown above.

Step 16: Prepare two strands of black fine Zebra Hopper Legs.

Step 17: Secure legs to waist or trunk of ant with 4-5 firm wraps of thread.

Step 18: Secured legs.

Step 19: Advance thread forward towards front body of ant covering up remaining visible white poly. Next, advance thread to hook eye and whip finish.

Step 20: Trim post to length of hook. The posts seem tall, but the longer posts aid in floatation and visibility, plus the fish can’t see them.

Finished Chubby Ant

Top view of Chubby Ant
Tie on and hold on!
Morrish Hopper Step-by-Step

PATTEN DESCRIPTION:
I first posted how to tie the Morrish Hopper in 2010 and have had great fishing results and fun tying different version of the realistic hopper pattern over the years. I had great success with different colored bodies like cream, flesh, green, yellow, and especially purple. I added a white poly wing to the hopper for the ultimate hopper/dropper fly and rough water fly. I also tied the hopper with various leg materials and styles, including thunder thigh legs, and madame-x style legs. Even though the original tutorial produced a great looking fly, I was never able to tie quick, perfect-looking hoppers every time.
Listed below is a quick and easy solution, and a new tutorial for tying perfect and effective, Morrish Style Hoppers. The Morrish Hopper Kit that we recently added to our online store includes realistic, pre-cut foam bodies, 1mm thick post material and the best rubber leg material for making rubber-knotted hopper legs. Available in three sizes and nine different color combination. I prefer 2xl long curved shank hopper or nymph hooks for tying the Morrish Hopper because of the better hook gap and the fact that the bend of the shank helps to secure the foam body when superglue is applied. Also, I use light 8/0 or 10/0 thread when tying the Morrish to minimize thread build up. The new Veevus 8/0 is a great all around thread because of its superior 3/0-like strength. Pre-cut bodies and Zebra Leg material can also be purchased separately. Tie some up, hopper season is right around the corner.

MORRISH HOPPER KIT:
Bodies: Pre-cut, realistic hopper bodies. 5mm thick two-tone colors. Available in 3 sizes, and 9 different color combinations. 12 ea.
Post: 1mm thick, high-vis orange pre-cut shapes. 1mm thick foam post helps the fly land upright compared to 2mm. 12 ea.
Legs: Zebra Hopper Legs, Natural/Medium, 8″ strand. The ultimate rubber leg material for knotted hopper legs. Ties in perfect every time, unlike single-strand leg material.
Now available with or without hooks.
Update: Check out our Hopper Hack video for a quick trick for trimming Morrish bodies.

Step 1: Holding the foam piece by the pointed end, carefully trim the edge of the foam with one scissor cut.

Step 2: Notice the thin strip of foam being trimmed off. All you are doing is rounding the edges of the foam. Cut the thinnest strips possible.

Image: Trimmed edge.
Step 4: Trim the rear tapered end of body with one scissor cut.

Image: Trimmed front and rear edges of foam body.

Step 5: Next, trim the opposite edges of the foam body as shown above.

Step 6: Trim the other side of the body as shown above.

Step 7: Trim out the wing of the hopper with one scissor cut half-way through the purple foam. *The tan foam is the top of the hopper, and the purple foam is the belly of the hopper.

Image: Notice cut is angled and cut half way through the purple foam.

Step 8: Next, trim off the remaining chunk of foam.

Image: Completed rear portion of hopper body. The tan foam is the wing of the hopper and the purple foam is the belly of the hopper.

Step 9: Trim the head of the hopper as shown.

Image: Trimmed head of hopper.

Step 10: Carefully cut 3/4 of the way through the purple foam, or belly, with a razor blade, 2 eye-lengths back from the head of the hopper.

Image: The cut should look like this.

Step 11: Next, slice 3/4 of the way through the purple foam, down the middle of the body, length-wise. Notice that the cut ends at the cut made in the prior step. Length of cut should extend to 3/4 mark, of foam body.

Image: Second cut should look like image above.

Step 12: Place hook in vise and make a thread base from eye of hook to hook point. 2xl curved nymph hooks or hopper-style hook are recommended.

Step 13: Whip finish behind hook eye.


Step 14: Place foam Morrish body on hook and make sure hook fits within the razor cuts as shown above.

Image: Proper placement of the foam body on the hook. Notice the eye of the hook extends just beyond the head of the hopper and the foam body just covers the length of the hook. Take care not to push the foam body too far down on the hook shank, covering up the hook gap.

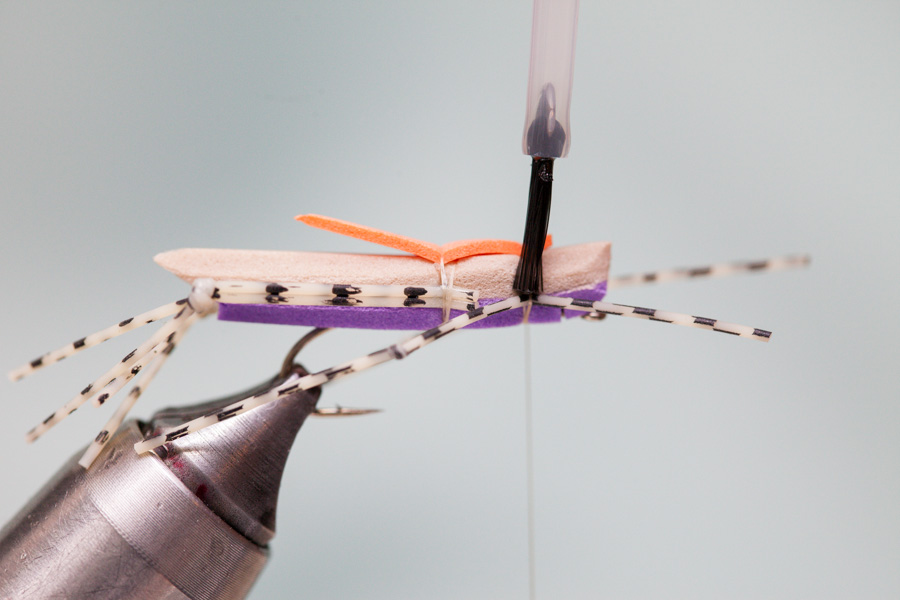
Step 15: Carefully apply superglue to hook only using a brush, bodkin or toothpick. Apply just enough superglue to saturate the thread wraps on the hook only.

Step 16: Notice superglue is being applied to hook. The superglue will saturate the thread on the hook and form a secure, permanent bond with the foam.

Step 17: After applying the superglue, squeeze and hold the foam body together for 10 seconds to set the glue.

Image: Proper placement of foam body on hook. Notice the eye of the hook extends just beyond the head of the foam body and the body does not interfere with the hook gap.

Image: Glued on body

Step 18: Start thread on hopper body with 2-3 loose wraps of thread close to the middle of the hook on large and medium hoppers, and right at the hook point on small hoppers. *Take care not to apply much thread pressure while tying the Morrish Hopper. The bulk of the fly is secured with superglue, not thread wraps.

Image: Foam post

Step 19: Trim the foam post to shape by cutting the blunt end to a point as shown.

Image: Trimmed foam post

Step 20: Secure foam post to top of body with 1 wrap of thread.

Image: Zebra hopper legs – 2 strands

Step 21: Tie an overhand knot in a double strand of Zebra Leg Material. Take care to not separate the front portion or two strands of the leg material. The legs will tie in perfectly every time if the two strands are not separated.

Step 22: Secure legs with one wrap of thread.

Step 23: Knot and tie in the near side leg with 2 wraps of thread. Notice the knots in the legs are even and extend to the end of the hopper.

Step 24: Secure both legs with a very small amount of superglue. The glue helps lock the legs to the sides of the foam hopper body. Superglue and rubber do not mix, so apply as little glue as possible.

Image: Secured legs. Notice the superglue covers only the thread wraps.

Image: Top view of leg placement

Step 25: Trim the tags of the hind legs.

Step 26: Advance thread forward, over the top of the foam body, as shown above.

Step 27: Form body segment with 2-3 wraps of thread.

Step 28: Form an overhand knot in a single strand of Zebra leg material for the front legs.

Step 29: Bind down the orange post and secure legs on both sides of the hopper with 3 loose wraps of thread. You can adjust each leg by twisting the front of each leg to the correct angle and length.
Step 30: Secure the legs into the proper position with a drop of superglue, not thread wraps. If you try to secure the legs with additional wraps of thread, the legs will twist out of position every time.

Step 31: Whip fishing fly with 3 turns. *You can also advance the thread at the belly of the fly, towards the hook eye and whip-finish behind the eye of the hook.

Step 32: Secure whip finish with a small drop of superglue. You can also add a small amount of glue to each knot in the rubber legs.

Step 33: Trim legs even.


Add eyes with Sharpie

Image: Top view of finished Morrish
COMPLETED PURPLE MORRISH HOPPER.
Variations on Morrish Hopper

The Morrish Hopper has been the best hopper pattern the last few seasons, and for good reason. The sculptured, 5-6mm thick foam body of the Morrish, and knotted rubber legs, imitates the natural silhouette and bulk of the natural hopper, perfectly. It floats all day and requires very little maintenance. This simple looking fly, simply works. Even though you can buy this pattern in many different colors, there are endless foam/leg combinations that you can come up with to customize the Morrish Hopper to your liking. I’ve had great results with flesh, yellow, cream or purple colored Morrish’s with rubber legs, or even thunder thigh legs. My favorite variation is to add a poly wing under the foam post for better floatation and greater visibility. The poly wing helps keep the Morrish upright with every cast, plus it makes for a great hopper/dropper setup. Below are a few variations on the Morrish Hopper that I like to tie up. Let me know some of your variations.

Variation #1: Thunder Thighs Hopper – Morrish Style
Body: Realistic Pre Cut Hopper Body, Tan/Olive
Kicker Legs: 1mm Foam with knotted super floss
Front Legs: Zebra Hopper Legs – Natural
Post: 1mm Orange Foam
Variation #2: Madame Morrish
Foam Body: Pre Cut Realistic Hopper Body, Tan/Yellow
Legs: Zebra Hopper Legs – Natural
Post: 1mm Yellow Foam

Variation #3: Salmor-ish
Foam Body: Fuzzy Foam – Realistic Salmonfly
Wing: Elk – Gray
Legs: Superfloss

Variation #4: Fuzzy Morrish
Foam Body: Fuzzy Foam – Golden
Legs: Zebra Hopper Legs – Natural
Post: 1mm Foam
Variation #5: Inked Morrish
Body: 5mm foam, Flesh/Gray
Legs: Zebra Hopper Legs – Green
Variation #6: Hopper Green
Body: Realistic Pre Cut Hopper Body, Olive/Green
Legs: Zebra Hopper Legs – Natural
Variation #7: Cicada/Beetle
Body: 5mm Foam, Black/Insect Green
Legs: Barred Rubber Legs, Olive/Black
Wing: Tape wing over poly wing
Post: 1mm Insect Green
Variation #8: Tan/Brown Morrish Hopper
Body: Realistic Pre Cut Hopper Body, Tan/Brown
Legs: Zebra Legs
 Variation #9: Purple Fuzzy Morrish
Body: Fuzzy Foam – Purple
Legs: Zebra Hopper Legs
Great New Product – Hayes Hand Kickstarter
I wanted to let all of you know about a Kickstarter campaign going on right now that I would love to see funded. The campaign is trying to raise funds for the production of a new fly rod holder that was created by a local Livingston, Montana guy, Joe Clemons. I got to try out the prototype a little and love how versatile it is. You can use it in a raft, drift boat, back of your truck or attach it to your waist pack for wading. I hope you’ll go take a look and support the project! It’s about half way funded at the moment with just 16 days left and Joe is offering some great rewards ranging from getting the product itself to a fishing trip in Mexico.
The Easy E Hopper Tutorial

PATTERN DESCRIPTION:
The Easy-E Hopper is an easy to see, easy to keep floating, and easy to tie, foam pattern that caught lots of fish this past summer. I generally tie this foam bullet-head pattern in smaller sizes to imitate caddis, stoneflies and little hoppers. The simple and durable madame-x style legs add lifelike movement to the pattern, but more importantly, the legs help this little pattern land upright and correct…nothing worse than having a pattern land sideways, or upside-down half the time, especially when you’re drifting from a boat and have one shot at a particular spot. This pattern is similar to the chubby chernobyl in appearance and float ability, with its thick dubbed body and poly wing. Yet, by omitting the the chernobyl style legs, and adding single legs and a bullethead, this pattern can be tied in much smaller sizes than the chubby chernobyl, down to size 14, to better imitate smaller insects and terrestrials. I tie this pattern mainly on a size 14, 3XL nymph hook with either tan or cocoa foam and a spiky hare’s ears dubbed body, or hare ear’s and ice dub mixed for a little more sparkle. I also tie this same pattern with a high-viz orange poly-wing for better visibility in poor light conditions. I thought the wing might scare off some fish, but they really didn’t seem to mind the bright orange wing. If you’re looking for great little attractor pattern, try tying up a couple of Easy E Hoppers and let me know how they work.
MATERIALS NEEDED:
Hook: Dai-Riki #710 nymph hook
Thread: UTC 70 denier
Body: 2mm foam cut to shape
Dubbing: Natural Hare’s Ear or Hare’s Ice Dub
Wing: Chubby Chernobyl Wing/Poly
Legs: Zebra Hopper Legs – Goldenstone

Step 1: Form a thread base on hook. End thread at hook eye.

Step 2: Dub a fairly thick body as shown above. End thread at hook point.

Step 3: Cut a strip of 2mm foam to shape. The width of foam should be width of gap of hook and tapered at one end as shown.

Step 4: Attach foam strip to hook with 3-4 firm wraps of thread.

Step 5: Attach a strand of poly yarn with 3-4 firm wraps of thread. Advance the thread in front of the poly wing and build a thread dam with 10-12 wraps of thread. The wing should be slightly slanted back and very secure.

Step 6: Gather the strand of poly together and trim at a slight angle as shown. Length of wing should extend to end of tapered foam body.

Step 7: Trimmed rear wing.

Step 8: Apply a thin amount of dubbing, enough to cover up the thread wraps that secure the poly wing and enough dubbing to be able to advance thread to two eyes length behind hook-eye.

Step 9: Bind down foam body with 3-4 firm wraps.

Step 10: Attach the front poly wing just like the rear wing. 3-4 wraps to bind down the poly wing, then 10-12 wraps in front of poly wing to secure.

Step 11: Trim front wing. Length of wing should be about the length of your hook and trim at a slight taper as shown.

Step 12: Trimmed front wing.

Step 13: Create the bullet-head by folding back the piece of foam and bind down with 5-6 wraps of thread. Try to keep the thread wraps 2 eye lengths behind the hook eye.

Step 14: Trim the butts of the foam flush to the poly wing and apply a few more wraps of thread back towards the wing to bind down any remaining foam.

Step 15: Attach legs on both sides of the fly and bind legs down with 10-12 firm wraps of thread.

Step 16: Apply a thin amount of dubbing, enough to cover up any remaining thread wraps. Advance the thread to hook eye and whip finish. Trim legs madame-x style…short in front, and longer towards the rear of the fly. I usually trim the rear legs even with the end of the foam body.
 The Completed Easy E

